December 27, 2008

Bagels

For 30 years my mom has been wanting to try out my grandmother's bagel recipe.  Ever since my stint at Big Apple Bagel in high school I've wanted to actually make some bagels instead of just turning them into delicious sandwiches.  Well, we finally got our chance.  My mom found my grandmother's bagel recipe, and after a fair amount of stress and whipping up a second batch using another recipe we ended up with A LOT of bagels.  Both recipes were good, and it was definitely a learning experience.  It wasn't as difficult as we thought it may be, and it was a pretty fun way to spend an afternoon.

Here's my grandma's bagel recipe:

Ingredients:
3 cups room temperature water
2 tbsp dry yeast
2 tbsp salt
6 tbsp sugar
12 cups flour
Toppings of your choice

1. Dissolve yeast in water.  Add salt & sugar.
2. Add the flour to the water mixture.  Knead until smooth or beat in mixer with dough hook until smooth.  Dough will be pretty stiff.
3. Place dough in greased bowl, cover, and let stand for 15 minutes.
4. Punch dough into flat rectangle, about 1" thick.  Cut into 36-40 strips.  Wrap loosely around 3 fingers, and pinch off ends of dough.  Overlap end 3/4" and press together to form a ring.  Cover with towel and let rise 20 minutes.
5. Drop bagels one at a time into 1 gal. boiling water with 1 tbsp. sugar.  Simmer 4-5 minutes, turning occasionally, or until they float.  Remove, and cool on a towel.  
6. Dip in toppings of your choice.  Bake on greased baking sheet for 30-35 minutes at 400.  

Here's the yeast and the water.


This is the flour we used, in case you were wondering.  I'm sure you were.  


After the yeast is dissolved you combine it with the dry ingredients.  Things took a turn for the worse at this point.  Trying to knead the mixture by hand was a huge pain that was going nowhere fast.  The recipe says you'll have a very stiff dough, but this was beyond stiff.  It was a mass of dry, crumbly dough.  While my mom and I were trying to figure out what to do, my dad walked through the kitchen and informed us that his mom always used her KitchenAid to mix the dough.  That would have been helpful about 15 minutes earlier, and my arms would have been a lot less sore the next day.  


So we tried the mixer method.  And when the first mixer began to smell like burning we tried another mixer.  And not much changed, so we went back to the old fashioned way and used our hands.  Or I used my hands while my mom looked up another recipe and started making that.   Ye of little faith.


After the dough was combined and pretty smooth it was left to rise for 15 minutes.  It didn't really rise, but it did sit there for 15 minutes.  


Then I flattened the dough until it was about an inch thick.  


I sliced a bunch of strips, and made them into rings.  In hindsight I should have made the holes smaller, especially if they'll be used for sandwiches.  


Then comes the simmering.  My grandma's recipe said to simmer for 4-5 minutes, but the other recipe we tried said to simmer them for 7-8.  I'm not sure which is preferable.  I'll leave that up to you.   Here's my pretzel simmering:


Bagel eyes!  I should make up a superhero named Bagel Eyes.  Unfortunately I know that whatever the heroic powers may be, they will not compare with those of Bacon Boy.  It takes a superhero like Bacon Boy to shoot bacon grease from his arms and corn dogs from his eyes.  


Here's the post-boil pretzel bagel.  


My mom did a much better job of slicing her batch.  


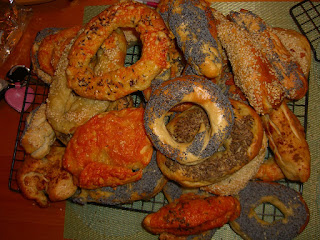
After the bagels have been boiled and cooled so you can pick them up, dip them in whatever toppings you want.  Or throw some cheese on them.  We used poppy seeds, sesame seeds, caraway seeds, and asiago cheese.  There were also a few everything ones I made with poppy, sesame, garlic, and salt.  


And once they come out of the oven you'll have something a little like this.  Can you tell I was really proud of my pretzel?


Here's more of the first batch.  I made a figure 8, too.  You're probably amazed by my creativity.  So am I. 


If you want to get really crazy, you can send bagel messages to your boyfriend who isn't there to be part of the bagel fun.  Oh yeah, we made a few cinnamon & sugar bagels, too. 


Here's the majority of the final product.  They were pretty good, although there is definitely room for improvement.  The next time I do this I plan on doing all of the kneading with my KitchenAid.  My mom ended up doing that for the second batch, and it was much more effective.  I would also make them with smaller holes so they're better for sandwiches.  

My dad was pretty impressed with the final product and made these two good looking sandwiches. 


Here is my reward for all of my hard work.


Another tip - if your bagels are too tough, you can turn them into bagel chips!  Thinly slice them, brush them with olive oil, sprinkle with herbs/spices/whatever, and bake them at 450 for about 5 minutes.  

Labels: , ,

December 26, 2008

Spice Crusted Salmon & Root Vegetable Chips

Thanks to the dense fog that is preventing me from driving into town to see my friends, I'm able to post for the second time today.  For dinner tonight we had salmon with a spice & hazelnut crust and root vegetable chips with a horseradish dip.

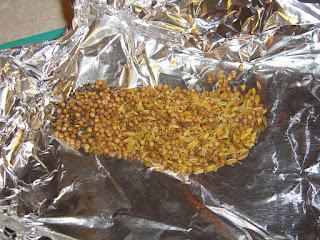
My mom came up with this delicious spice mix.  It was about 2 tablespoons each of coriander, fennel, and mustard seed.  She started out by toasting them all for 10 minutes or so.


And then she crushed them.  A food processor would probably do the job, too.  Once they were crushed she threw in about a half cup of toasted, coarsely ground hazelnuts.  There was plenty of this mixture to coat two big pieces of salmon, so you could make a much smaller batch or store a bunch of it for another day.  It would be good on chicken, pork or any other fish, too.


While my mom was making the spice mixture, I made a horseradish dip for the chips.  I used between 1-1/2 and 2 tablespoons of prepared horseradish, about 3/4 cup sour cream, a couple tablespoons of white wine vinegar, and salt & pepper.  You can add more or less sour cream & vinegar to get to the level of spiciness that you prefer.  You could easily substitute plain yogurt or creme fraiche or any combination of them for the sour cream.  


For the chips you can use whatever root vegetables you have on hand.  We used potatoes, sweet potatoes, parsnips, and beets.  Start out by peeling everything but the potatoes.  Or if you have some strange aversion to potato skins, go ahead and peel those, too.  If you have a mandoline, this is a great way to put it to use.  Otherwise you can make more rustic chips and slice the chips by hand.  Be very careful when using a mandoline or you can end up with a little bit of a mess and a little less of your index finger.


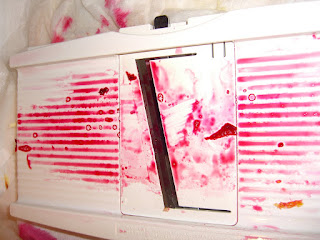
Just kidding.  That's the post-beet mandoline.  I hope that didn't just spoil your appetite.  

Once all the veggies are sliced, toss them in a big bowl with olive oil to coat and salt & pepper.  You can also add any spices you'd like.  Sometimes I add dill.  Sometimes rosemary.  Tonight we added a little malt vinegar, but it turned out that we didn't add enough to taste it when they came out of the oven.


Here are the sliced beets.  Are they lovely?


Here's another picture of them with bad lighting.  I kind of liked the picture, though.  It looks like two big eyes.  Or tie dye.  


Bake the chips at 400-450 until they're browned or done to your liking.  Check them every 5 minutes or so to stir them, flip them, and/or season them.  


Moving right along, here is our wonderful salmon.  Before coating them with the crust mixture my mom brushed it with a very thin coat of olive oil.  Once coated, it was just baked alongside the chips.  


Here's the salmon when it came out of the oven.


And here is everything ready to eat.  It was all really, really good.  The crust was a great alternative to the usual lemon & dill preparation I do with salmon.  The chips were awesome as well.  I love horseradish, and the dip worked well with both the chips (especially the beet ones) and the salmon.  


Labels: , , ,

Chocolate Chip Applesauce Cake

For as long as I can remember, my mom has been making chocolate chip applesauce cake.  It usually happens around Christmas.  On Valentine's Day we all get heart-shaped ones.  Sometimes we'll get one in the mail on birthdays.  It's kind of a lightly spiced cake with raisins, nuts, and a lot of chocolate chips.  They're really good, they ship well, and they freeze well.  We made some today to send to my brothers who didn't make it home for Christmas as well as some for ourselves.  Luckily for all you readers she was willing to share the recipe.  

Chocolate Chip Applesauce Cake

Ingredients:
1/2 cup unsalted butter*
1 cup granulated sugar
2 eggs
3/4 cup sifted flour
1 tsp. baking soda
1/4 tsp. salt
1/4 tsp. ground cloves
1/2 tsp. mace or allspice
1 tsp. cinnamon
3/4 cup chunky applesauce
1/2 cup raisins
1/2 cup chopped nuts
1 cup chocolate chips

*You can use shortening instead, but use 1 cup applesauce instead of 3/4 cup if you do.

1. Cream the butter/shortening.  Add sugar gradually and cream until fluffy.  Add eggs one at a time.  Beat well.
2. Sift together dry ingredients.  Add dry ingredients alternately with the applesauce in small amounts.  Beat well after each addition until smooth.  
3. Stir in raisins, nuts, and half of the chocolate chips.
4. Pour batter into 9x5x3 loaf pan, lined on the bottom with wax paper.  Sprinkle with remaining chocolate chips.  Bake at 325 about 1 hr. 15 min. or until a tester comes out clean.  Cool cake.  Cover tightly with plastic wrap or foil to store.  

Here is the batter before going into the pan.  We definitely used more chocolate chips than were called for.  And we tripled the recipe, so don't worry if it looks like there's a lot of batter here.


Here are the line loaf pans.  We also buttered the sides, but that might not be necessary.


More chocolate to top it off.


And the final product.  


Here it is before it went into my tummy.  I suggest warming it up before eating it so the chocolate chips are melted.  


Labels: , ,

December 25, 2008

Pizza Part III

For dinner on Christmas Eve we decided to make pizzas.  We had to go to church in the evening, and then we headed home to make our pizzas.  Due to a little incident the night before involving sparks and flames in the microwave, my dad had bought a new microwave on his way home earlier in the day.  Thinking that switching out the new microwave for the old one would be a fairly simple task, my dad and I decided we could do that quickly before dinner.  Three hours later a new microwave was installed, a beach towel that had been protecting the stove had a hole burnt through it, and my mom and I were as determined as ever to make pizzas.  So what if it was 9:30?  We had spend hours that day shoveling and lifting a microwave, so nothing was going to stop us from rewarding ourselves with pizza.  And a shot of Patron.


Here are the ingredients we used.  My mom had made the crust earlier in the day.  I'm not sure what recipe she used, but we'll probably make pizza again before I head back to school so I'll post the crust recipe then.  In case you can't see what's pictured, there are fresh tomatoes, fresh mozzarella, sun-dried tomatoes, fresh basil, artichoke hearts, capers, tomato sauce, and hummus.


When mom my makes pizzas she bakes the crust for about 5 minutes before anything goes on it.  Right when she takes the crust out of the oven she brushes it with olive oil and then sprinkles on basil or oregano.  


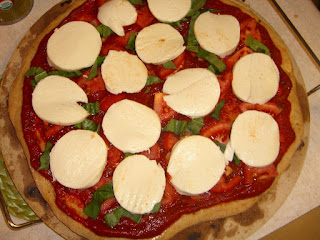
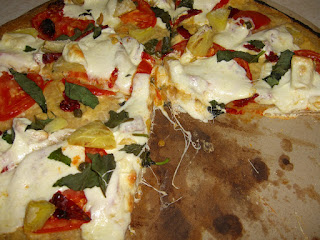
We made two pizzas this time - one more traditional one and one kind of Mediterranean one.  The traditional one had tomato sauce, fresh tomatoes, fresh basil, and fresh mozzarella.  


The other one had a hummus base, fresh tomatoes, sun-dried tomatoes, artichoke hearts, capers, and fresh mozzarella.  


Here's the traditional one right out of the oven.  


And here's the hummus one.  


More pizza ideas to come soon...

Labels: , ,

Chocolate-Pistachio Biscotti

I'm generally not a huge fan of biscotti, but for some reason it's been sounding good to me lately.  I really wanted to make some with chocolate and pistachios, so I found a recipe for Chocolate-Hazelnut Biscotti and just substituted pistachios.  It turned out well, and some lucky folks will be getting some as late Christmas gifts.  


Start out by toasting 1-1/2 cups pistachios.  


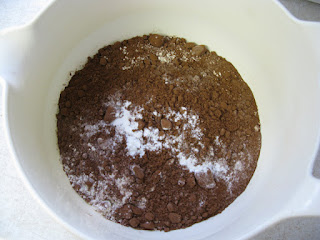
While the pistachios are toasting, mix the following: 3 cups flour, 1 tsp baking soda, 1 tsp baking powder, 2/3 cup unsweetened cocoa, and 1/2 tsp salt.


Beat 2 sticks of softened, unsalted butter with 2 cups of sugar. 


Add 3 eggs, 1-1/2 tsp vanilla extract, and 1/2  tsp almond extract.  


Beat until combined, and then add in the flour/cocoa mixture in batches.  


Once the dry ingredients are incorporated, add in 1/2 cup chopped pistachios, 1 cup whole pistachios, and 1 cup semisweet chocolate chips. 


Mix them all together until they're pretty evenly distributed.  It's pretty thick batter, so it takes a little muscle.  On the bright side, you work off so many calories mixing the batter that you can eat more biscotti in the end!


Divide the dough in two and form each half into a log on a parchment-lined cookie sheet.  Mine were about 12 inches long, 5 inches wide, and 1 inch tall.  Try to make them similar in size.  If they're different sizes you have to keep an eye on them to the smaller one doesn't burn.  

Bake them at 350 for 30-35 minutes or until they are slightly firm.  While they're baking you can start with the clean-up.  Maybe even lick the bowl a few times because it looks like brownie batter.  And it kind of tastes like it, too.  It was so good that I look stoned.  Maybe if I was stoned I would have an excuse for eating biscotti batter like there was no tomorrow.  I guess it is the holidays.  I'll eat all the batter I want.  


After 35 minutes or so take the biscotti out of the oven and let it rest for about 10 minutes.  Then transfer it to a cutting board and with a serrated knife slice it into about 3/4-inch pieces.  After it's all sliced put the slices on their sides back on the cookie sheets, and bake for another 15 minutes.  They may not be totally hard after 15 minutes, but they will harden up more after you take them out of the oven.  


Transfer to cooling racks right after taking them out of the oven.  I just realized that I should have melted some chocolate to dip the ends in.  You should learn from my mistakes and dip your biscotti in molten chocolate.  Enjoy!


Labels: , ,